Bajdi electronics

Hobby electronics website

Browse: Page 10

LCsoft VS1053 MP3 module

By Bajdi on June 23, 2013

VS1053 MP3 module

VS1053 MP3 module

There are several MP3 shields available for Arduino. Most of them are based on the VLSI VS1053 chip. I’m not a fan of the shield system as it limits you which pin on the shield connects to the micro controller. Also my own “Bajduinos” are not shield compatible.

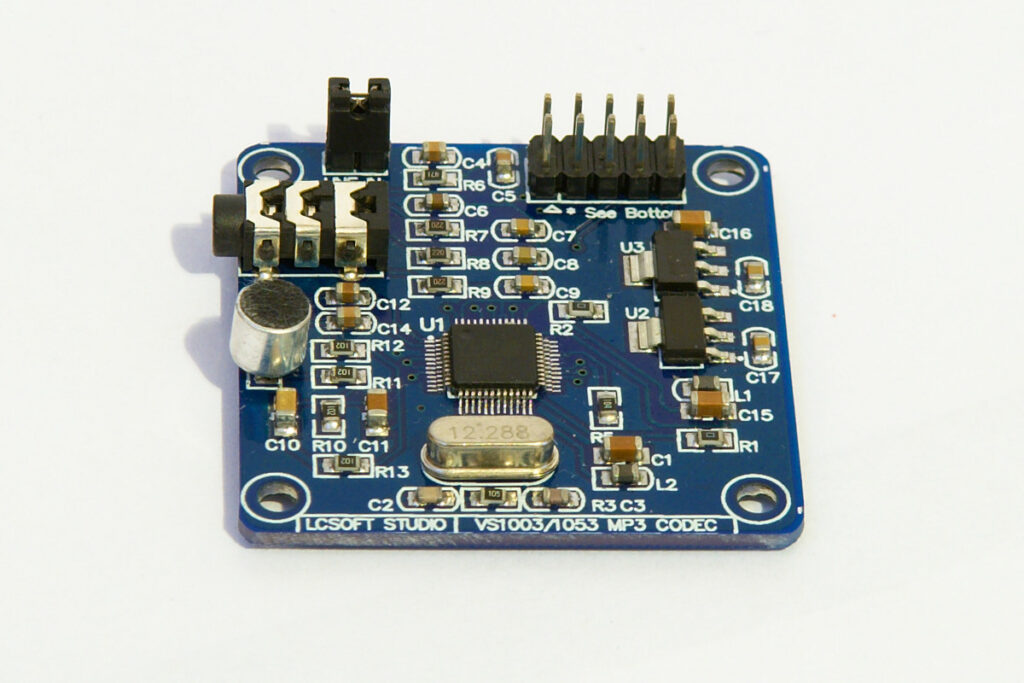
Thankfully there are some break out boards available with the VS1053 chip. I bought one on Ebay for less then 8€. It’s made by LCsoft. I did a bit of googling before I bought the board and found some sketches and Arduino libraries for the VS1053 chip. So I thought it would be easy to make an Arduino play MP3’s. Of course it turned out to be a bit different…

No matter which sketch or library I tried I could not get the damn thing to work. I thought that I maybe had a faulty board until I found Maniacbugs VS1053 midi library. I installed the library and tried the example sketch. The example sketch makes the chip play a simple midi file. And for the first time I got some music out of the VS1053 module 🙂 Unfortunately this library only supports midi files. I wanted to let my Arduino play MP3’s…

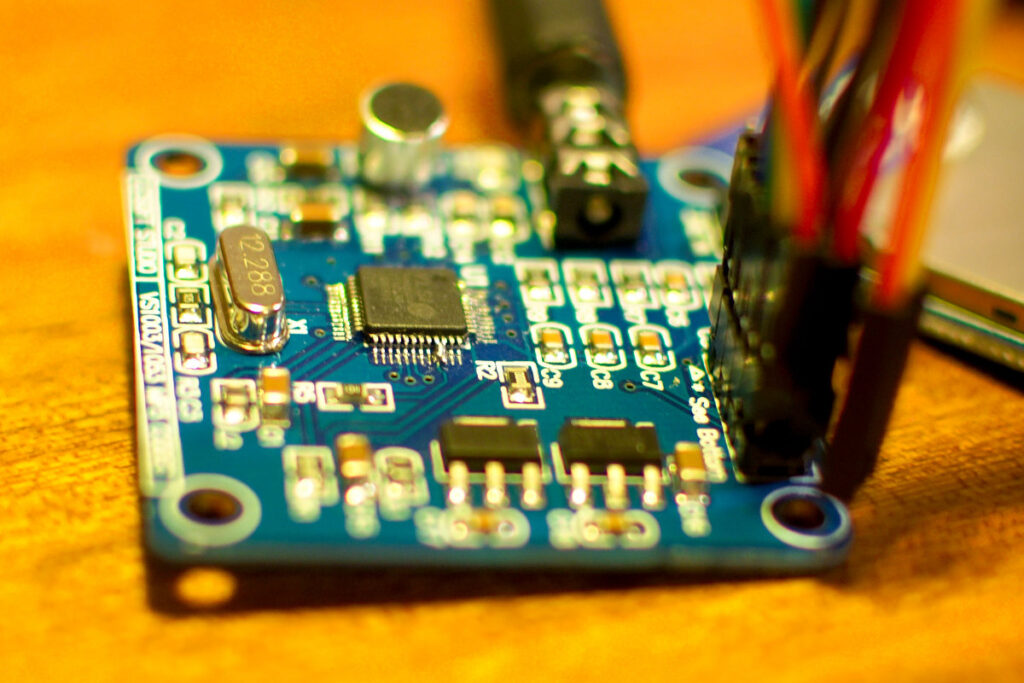
I was about to give up on it until someone pointed me to this topic on the VLSI support forums. Looks like the LCsoft board is missing a trace or resistor to make it play mp3’s. The board boots the VS1053 chip in midi mode. Thankfully it’s possible to modify it and boot it in mp3 mode. You just need to solder a bridge connecting pin 33 and 34. I used my thinnest (0.2mm) solder tip to solder the bridge. Here is a photo of the modification I made:

LCsoft VS1053 MP3 module

LCsoft VS1053 MP3 module

I then tried out the example sketch of this library. And it worked, finally I had an Arduino that could play mp3’s 🙂
Some handy links:
VS1053 specification and datasheet: http://www.vlsi.fi/en/products/vs1053.html
Arduino library for the VS1053 chip: http://mpflaga.github.io/Sparkfun-MP3-Player-Shield-Arduino-Library/
Support forum for the above library: http://www.billporter.info/forum/forum/sparkfun-mp3-shield-support-forum/

Posted in Buying parts | Tagged VS1053 | 26 Responses

My arduino hexapod: Bajdupod 996R it’s finished :)

By Bajdi on June 9, 2013

Bajdupod 996R: Arduino hexapod from Bajdi on Vimeo.

This afternoon I made another video of my hexapod. The last weeks I’ve written some more code for it. It now has an autonomous mode and a remote controlled mode. In the autonomous mode it can track an IR light source using the WiiCamera sensor and avoid obstacles which it detects with 2 ultrasonic sensors. In the remote controlled mode I can let it walk in every direction. I also have a mode to move the body without moving the tips of the legs, this is where inverse kinematic comes in very handy. I also programmed a “fitness mode” where the hexapod lift 3 legs of the ground and moves them up. In the last mode I can control each leg individually, you can see this in the last part of the video. My code is far from perfect, but it works 🙂
It was not easy to program all these things and let it all work together.

This is a list of parts that I have used in my hexapod:

Mechanical:

  • Hexapod chassis kit (bought on Ebay)
  • 3x laser cut acrylic plates (made by local shop)
  • 6x bearings (to mount the underside of the servo brackets)
  • 18 metal servo horns (bought from Aliexpress)
  • Acrylic ultrasonic sensor bracket (bought from Rocket brand studios)
  • Pan/tilt kit (for WiiCamera sensor, bought from Rocket brand studios)
  • Lots of M3 nuts and bolts

Servos:

  • 18x MG996R servos (bought on Ebay)
  • 3x SG90 servo (to move the sensors, bought on Ebay)

Electronics:

  • 3x 8A UBECs (bought from Hobbyking)
  • 3S 3000mAh Lipo battery (powers the 18 MG996R servos)
  • 2S 1000mAh Lipo battery (powers the 3 SG90 servo and sensors)
  • 20A automotive blade fuse (protects 3S Lipo battery, bought on Ebay)
  • In line fuse holder + 1A fuse (protects 2S Lipo battery)
  • Servo power distribution PCB (own design, made by Seeedstudio)
  • Seeeduino Mega2560
  • ATmega328 board (own design, made by Seeedstudio)
  • nRF24L01 module (wireless control, bought on Ebay)
  • 2x HC-SR04 ultrasonic sensors
  • WiiCamera sensor (bought from Rocket brand studios)
  • 2 x 74HC595 shift registers (to control the 16 leds)
  • 18 blue leds
  • 18 220 Ohm resistors
  • 4 resistors for 2 voltage dividers (analog reading of the 2 Lipo batteries)
  • Perfboard, lots of wires
  • LM2596 PCB (powers the 3 small servos, 16 leds and the sensors, bought on Ebay)

I reused the remote control from previous projects. This project cost me quite a bit of money. During the building of Bajdupod 996R one servo burned up. Yes only one, I can assure you these servos have had a very hard time.  So I am quite surprised that I did not burn up more servos.

Quite a bit of time and money was spent on powering this power hungry beast.  I initially used 2 8A UBECs and killed them pretty fast. Then I bought 3 more 8A UBECs and designed a new power servo PCB. Then I destroyed a 3S 3000mAh Lipo battery.  I had to recharge the battery so many times that the Lipo charger died on me. Luckily I had 2.  The hexapod eats Lipo’s for breakfast, lunch and dinner. The battery lasts less then 10 minutes.

Coding this beast has taken up most of my free time the last couple of months. I had never thought I would be able to program such a complex project one year ago. I have only been playing with Arduino for one year and a halve, before that I had never written a line of code.  I’ve never taken any programming courses, everything I’ve learned comes mainly from lots of trying and testing. I can assure you it took me lots of dedication and hard work to accomplish what you see in the above video 🙂

Posted in Bajdupod 996R | Tagged hexapod | 5 Responses

Non blocking code for the 28BYJ-48 stepper motor

By Bajdi on June 1, 2013

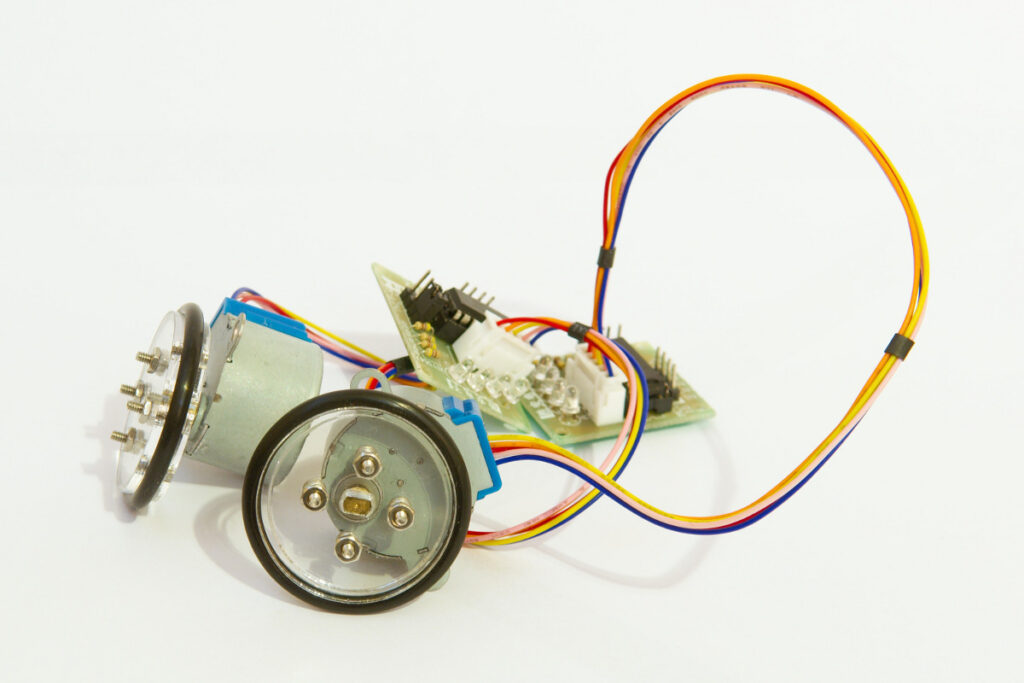
28bjy-48 stepper motor with wheels

28bjy-48 stepper motor with wheels

One of the first things I tried when I started playing with Arduino was running a stepper motor. As I had bought 2 small 28BYJ-48 stepper motors with my first Arduino. Since I knew very little about programming I just used the Arduino stepper library. The library works but it’s not that usefull, it is a blocking library. You can’t do much else when running the motors. I then put the motors away and nearly forgot about them. Until I saw that Rocket Brand studios sells wheels that fit these motors. So I ordered a couple of the wheels. I might make a small robotic vehicle powered by these little stepper motors.
Now that I have a litle bit more experience writing code I wrote some non blocking code for my little stepper motors. The code also includes an acceleration function. It will slowly start the motor and after x number of steps it will ramp up the speed 🙂
Here is a video I made during the testing of my code:

This code will run the stepper motor in both directions for 15 seconds:

// http://www.bajdi.com
// Non blocking code for a 28BYJ-48 stepper motor controlled by an ATmega1284
// Using the delay function in void loop will break this code

//declare variables for the motor pins
const int motorPin1 = 11;	// IN1 on motor control board
const int motorPin2 = 12;	// IN2
const int motorPin3 = 13;	// IN3
const int motorPin4 = 14;	// IN4

#define runEvery(t) for (static typeof(t) _lasttime;(typeof(t))((typeof(t))millis() - _lasttime) > (t);_lasttime += (t))

unsigned long previousMicros;
unsigned long steps;
byte motor1Step = 0;
bool direction;
int stepInterval;

void setup() {
  //declare the motor pins as outputs
  pinMode(motorPin1, OUTPUT);
  pinMode(motorPin2, OUTPUT);
  pinMode(motorPin3, OUTPUT);
  pinMode(motorPin4, OUTPUT);
}

void loop(){
  // Time between steps in microseconds = stepInterval
  if (steps < 200)
  {
    stepInterval = 1800;
  }
  if (steps >= 200 && steps <= 400)
  {
    stepInterval = 1400;
  }
  if (steps > 400 && steps <= 600)
  {
    stepInterval = 1100;
  }
  if (steps > 600 && steps <= 800)
  {
    stepInterval = 900;
  }
  if (steps > 800)
  {
    stepInterval = 650;
  }

  // Switch direction every 15 seconds
  runEvery(15000)
  {
    steps = 0;  // reset steps
    if (direction == LOW)
      direction = HIGH;
    else
      direction = LOW;
  }

  if (direction == LOW)
  { 
    clockWise();
  }
  else
  {
    counterClockWise();
  }
}


void clockWise()
{
  // Clockwise stepper code
  if (micros() >= previousMicros){
    previousMicros = previousMicros+stepInterval; 
    motor1Step = motor1Step +1;

    if (motor1Step == 9){ 
      motor1Step = 1;
      steps = steps +1;
    }
  }
  switch (motor1Step){
  case 1:
    digitalWrite(motorPin4, HIGH);
    digitalWrite(motorPin3, LOW);
    digitalWrite(motorPin2, LOW);
    digitalWrite(motorPin1, LOW);
    break;
  case 2:
    digitalWrite(motorPin4, HIGH);
    digitalWrite(motorPin3, HIGH);
    digitalWrite(motorPin2, LOW);
    digitalWrite(motorPin1, LOW);
    break;
  case 3:
    digitalWrite(motorPin4, LOW);
    digitalWrite(motorPin3, HIGH);
    digitalWrite(motorPin2, LOW);
    digitalWrite(motorPin1, LOW);
    break;
  case 4:
    digitalWrite(motorPin4, LOW);
    digitalWrite(motorPin3, HIGH);
    digitalWrite(motorPin2, HIGH);
    digitalWrite(motorPin1, LOW);
    break;
  case 5:
    digitalWrite(motorPin4, LOW);
    digitalWrite(motorPin3, LOW);
    digitalWrite(motorPin2, HIGH);
    digitalWrite(motorPin1, LOW);
    break;
  case 6:
    digitalWrite(motorPin4, LOW);
    digitalWrite(motorPin3, LOW);
    digitalWrite(motorPin2, HIGH);
    digitalWrite(motorPin1, HIGH);
    break;
  case 7:
    digitalWrite(motorPin4, LOW);
    digitalWrite(motorPin3, LOW);
    digitalWrite(motorPin2, LOW);
    digitalWrite(motorPin1, HIGH); 
    break;
  case 8:
    digitalWrite(motorPin4, HIGH);
    digitalWrite(motorPin3, LOW);
    digitalWrite(motorPin2, LOW);
    digitalWrite(motorPin1, HIGH); 
    break;
  } // end switch
}


void counterClockWise()
{
  // Counterclockwise stepper code
  if (micros() >= previousMicros){
    previousMicros = previousMicros+stepInterval; 
    motor1Step = motor1Step +1;

    if (motor1Step == 9){ 
      motor1Step = 1;
      steps = steps +1;
    }
  }
  switch (motor1Step){
  case 1:
    digitalWrite(motorPin1, HIGH);
    digitalWrite(motorPin2, LOW);
    digitalWrite(motorPin3, LOW);
    digitalWrite(motorPin4, LOW);
    break;
  case 2:
    digitalWrite(motorPin1, HIGH);
    digitalWrite(motorPin2, HIGH);
    digitalWrite(motorPin3, LOW);
    digitalWrite(motorPin4, LOW);
    break;
  case 3:
    digitalWrite(motorPin1, LOW);
    digitalWrite(motorPin2, HIGH);
    digitalWrite(motorPin3, LOW);
    digitalWrite(motorPin4, LOW);
    break;
  case 4:
    digitalWrite(motorPin1, LOW);
    digitalWrite(motorPin2, HIGH);
    digitalWrite(motorPin3, HIGH);
    digitalWrite(motorPin4, LOW);
    break;
  case 5:
    digitalWrite(motorPin1, LOW);
    digitalWrite(motorPin2, LOW);
    digitalWrite(motorPin3, HIGH);
    digitalWrite(motorPin4, LOW);
    break;
  case 6:
    digitalWrite(motorPin1, LOW);
    digitalWrite(motorPin2, LOW);
    digitalWrite(motorPin3, HIGH);
    digitalWrite(motorPin4, HIGH);
    break;
  case 7:
    digitalWrite(motorPin1, LOW);
    digitalWrite(motorPin2, LOW);
    digitalWrite(motorPin3, LOW);
    digitalWrite(motorPin4, HIGH);
    break;
  case 8:
    digitalWrite(motorPin1, HIGH);
    digitalWrite(motorPin2, LOW);
    digitalWrite(motorPin3, LOW);
    digitalWrite(motorPin4, HIGH);
    break;
  } // end switch
}
Posted in Arduino sketches | Tagged 28BYJ-48 | 4 Responses

« PreviousNext »

Recent Posts

  • 3D Printer extruders
  • Mearm forked
  • Arduino time lapse – camera pan device
  • Bought a 199$* Prusa I3 3D printer
  • Simple DIY lab power supply
  • Bajduino
    • Bajduino 1284
    • Bajduino 328
  • Stepper robot arm

Recent Comments

  1. 200+ Arduino Projects List For Final Year Students - He Loves Math on Obstacle avoiding robot made from cheap parts
  2. MP3 Alarm Clock: Crafting Customized wake-Up tunes with Arduino on Arduino MP3 alarm clock
  3. Bas on L9110 H-bridge module
  4. Victor on L9110 H-bridge module
  5. WAQAR AHMED on Dimming led with IR remote control

Archives

  • June 2016
  • August 2015
  • May 2015
  • January 2015
  • December 2014
  • November 2014
  • May 2014
  • April 2014
  • March 2014
  • February 2014
  • January 2014
  • December 2013
  • November 2013
  • October 2013
  • September 2013
  • June 2013
  • May 2013
  • April 2013
  • March 2013
  • February 2013
  • January 2013
  • December 2012
  • November 2012
  • October 2012
  • September 2012
  • August 2012
  • July 2012
  • June 2012
  • May 2012
  • April 2012
  • March 2012
  • February 2012
  • January 2012
  • December 2011

Categories

  • 3D printing
  • Arduino
  • Arduino sketches
  • Bajdupod 996R
  • Bajdupod 9G
  • Bob the biped
  • Buying parts
  • Dagu Rover 5
  • Dagu service droid
  • Gentoo
  • Insectbot
  • Line following robot
  • Raspberry Pi
  • Self balancing bot
  • Bajduino
    • Bajduino 1284
    • Bajduino 328
  • Stepper robot arm

Copyright © 2026 Bajdi electronics.

Powered by WordPress and Hybrid by Bajdi.