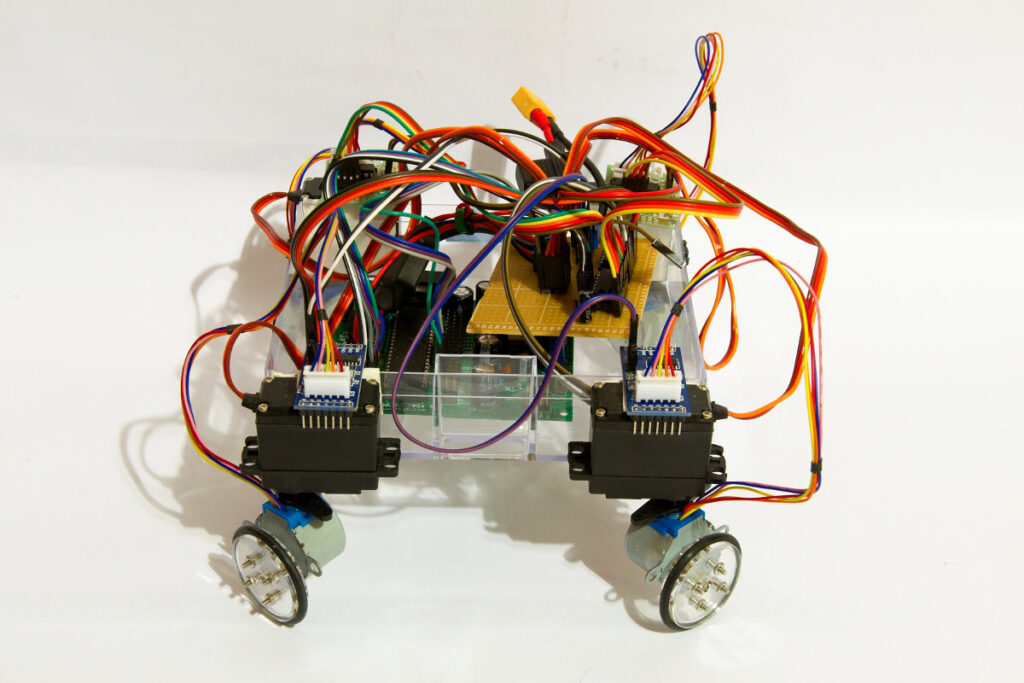
stepperbot
Chris from Rocket Brand Studios sent me 4 wheels that fit the little 28BYJ-48 stepper motors a couple of months ago. I only had 2 steppers so I ordered 2 more motors and control boards on Ebay. Cost me less then 2€ a piece, and that’s for the stepper motor and control board.
I wanted to try something different then the usual differential drive robots. Since I had a lot of spare servos I decided to fit the motors to 4 cheap MG995 servos. I just hot glued the 4 motors to the servo horns. I then used double sided tape to attach the servos and motors to a plastic box that is the chassis. This gives my robotic vehicle 4 wheel drive and 4 wheel steering.
The Arduino IDE comes with a stepper library, but I decided to write my own stepper code. For 4 stepper motors I would have needed 16 digital pins and then another 4 pins for the servos. Controlling a stepper motor is not that difficult. It’s just a matter of setting the pins high/low in the right sequence at the right time. I thought why not try and use a couple of 74HC595 shift registers to control the stepper motors? I have controlled 16 leds with 2 shift registers in the past so why not 4 stepper motors? I soldered 2 shift registers to a piece of perfboard and tested the board with some leds. That worked 🙂 There is an excellent tutorial that shows how to connect 2 74HC595 shift registers to an Arduino on the bildr.org website. The bildr tutorial also includes code on how to control each pin of a shift register individually. Based on that code I started writing a sketch that would let all 4 stepper motors run in the right direction.
These little stepper motors are slow and have very little torque. From what I have read they are manufactured to be used in the blinds of air-conditioning systems. To speed them up and give them some more power I used a 3S Lipo battery. This is well over the 5V at which these motors are rated. I have not killed a motor yet… Since they are so cheap it’s worth taking the risk. To let them run at a reasonable speed I had to write code to slowly ramp up the speed. Else the motors would not move.
This turned in to a huge sketch. The sketch in the following video contains over 1400 lines of code. There must be a much easier way of coding this? You can download the sketch here: 4 wheel drive and 4 wheel steering stepper bot sketch.
Your sketch can be a lot simpler by using helper functions and lookup tables.
Here are some suggestions to get you started.
(None of this has been tested for syntax or function, but if you can understand
what I’m suggesting, you will see how to shrink your code.)
// What are the current positions of the motors
// Start them all at position zero
int8_t currentSteps[4] = [0,0,0,0];
// What pattern to use for each step phase
const uint8_t steptable[8][4] = [
[HIGH,LOW,LOW,LOW],[HIGH,HIGH,LOW,LOW],
[LOW,HIGH,LOW,LOW],[LOW,HIGH,HIGH,LOW],
[LOW,LOW,HIGH,LOW],[LOW,LOW,HIGH,HIGH],
[LOW,LOW,LOW,HIGH],[HIGH,LOW,LOW,HIGH]];
const int8_t speedForward[4] = [1,1,1,1];
const int8_t speedBackward[4] = [-1,-1,-1,-1];
// motor 1 = backward / motor 2 = forward / motor 3 = forward / motor 4 = backward
// From your comment for sideleft. By the way, a software person
// would number the motors starting from 0
const int8_t speedSideLeft[4] = [-1,1,1,-1];
//etc.
// Motor is 0,1,2,3 .
// Step can be any number, but then it gets divided down by 8 and the
// remainder is the step that’s used
int StepMotor(int motor, int step)
{
step = step % 8; // The % operator takes the remainder when divided by 8
if (step < 0) step += 8; // The remainder can be negative (-7 to -1), so fix that
for (int wire = 0; wire < 4 ; wire++)
{
setRegisterPin(wire + 4*motor, steptable[step][wire]);
}
return step;
}
void StepBySpeed(const int8_t speed[4])
{
for (int motor = 0 ; motor = previousMicros)
{
previousMicros = previousMicros+stepInterval;
StepBySpeed(speedForward);
}
}
// etc.
// Some of the code got mangled. Starting with StepBySpeed:
void StepBySpeed(const int8_t speed[4])
{
for (int motor = 0 ; motor = previousMicros)
{
previousMicros = previousMicros+stepInterval;
StepBySpeed(speedForward);
}
}
// etc.
WordPress keeps corrupting the code. I sent you the code by email instead.
Big thanks for the code, I understand how to make my code a lot simpler now 🙂
To publish code use Sytanx Highlighter plugin. You can then publish nice code with all indentations and proper formating.
I have that plugin installed, as you can see here: http://www.bajdi.com/rover-5-encoder-speed-control/
But my stepperbot sketch is over 1000 lines long, a bit to big to post 🙂
where did you get the wheels, and how did you fix them to the motor?
Bought them from rocketbrandstudios.com.