By Bajdi on January 12, 2013

My robots
About one year ago I bought my first Arduino and started this blog to share my experiences with Arduino. My original goal was to learn C/C++, and I thought Arduino was a good way to get me started.
After I connected a couple of buttons to my Arduino Uno and blinked some leds I started looking around what I could do with my new toy. I didn’t have much inspiration until I stumbled on letsmakerobots.com. I was going to make my own little robot 🙂 For the base I decided on the Dagu Rover 5 platform. Over the year I have transformed it multiple times. It is now my development platform. I have written dozens of sketches for it, from remote controlling it with my self designed Arduino based remote control to autonomous sketches using ultrasonic sensors, encoders, a Wiicamera, accelerometer, magnetic compass and lots of other electronics. I then built a simple line following robot, which was quite easy to program. I then started to built a hexapod, which was a lot more difficult. But I’m quite happy with the last robot I’ve built, my small Ebay-bot. I’ve written some sketches for it that work pretty well 🙂
The letsmakerobots community has been a big inspiration and help during my robot adventures. And I’ve met some friendly and helpful people on the LMR shoutbox.
Arduino has lots of libraries that are easy to use. Most come with example sketches that are easily modified. It’s only when you start mixing all these libraries that things become a lot harder. Some of the libraries will not play together. You will need some real programming skills to solve those issues, skills that I do not have 🙁 I would really need to take a programming course to improve my programming. Unfortunately where I live the only programming courses that schools offer are MS Visual C and java. Two languages that don’t interest me, and are not very useful for embedded programming.
I’m afraid I got a bit diverted and have spent more time learning electronics and searching for electronic parts then learning programming. I’ve spent a massive amount of time on Ebay searching for electronics and robot parts. I did learn to work with Eagle and figured out the basics of it. Now I can say that I have designed my own simple Arduinos, I have a dozen “Bajduinos” sitting on my desk 🙂 I found the Arduino form factor to limiting and I’m not a fan of the shield system. I prefer to buy separate modules and use wiring with Dupont connectors to hook them up. That is the reason I started making my own boards.
My plans for this year:
- Buy a couple of good C/C++ books and learn more about programming.
- Built a new hexapod with 3 DOF legs and program it using inverse kinematics. That will be quite a challenge 🙂
- Built a couple of boards with smd components, something that is new for me.
- Built a robot localization system to guide my robots using IR, ultrasonic sensor and nRF24L01 wireless modules.
- Try to write some more advanced code for my Rover 5.
- Figure out all the unused sensors and electronics that I have bought during last year.
- Built some kind of simple data logging system, based on Arduino of course.
- Spent less time browsing Ebay so I can get more things done 😀
Posted in Arduino | Tagged robot |
By Bajdi on December 17, 2012
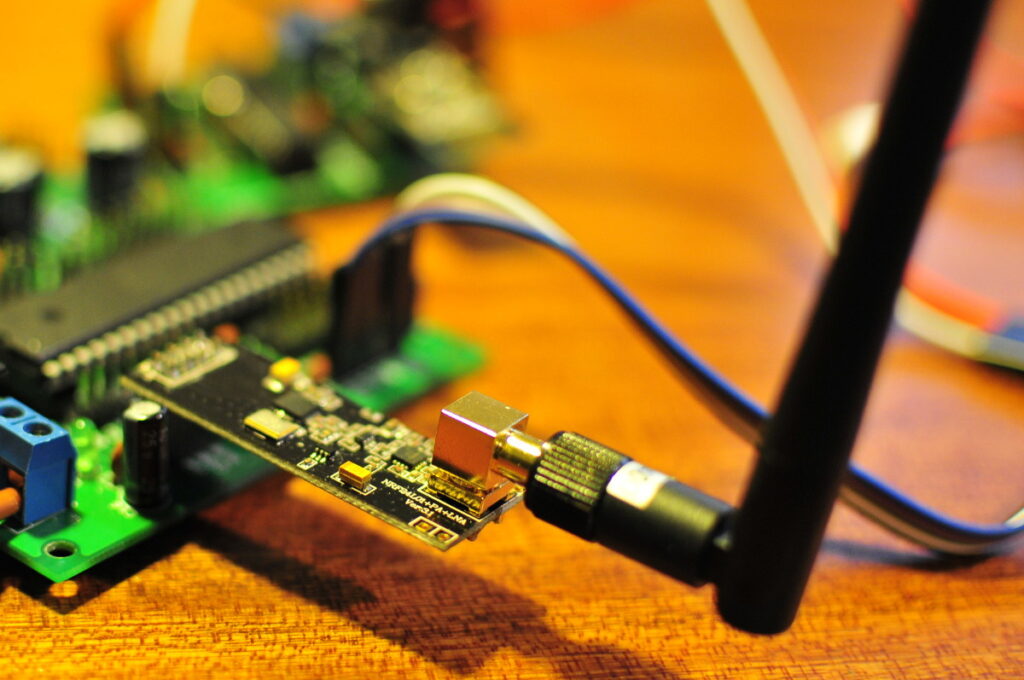
Beginning of this year I bought my first nRF24L01 wireless modules. I did not have a clue back then how they worked and if I was going to get them to work with Arduino. I had found a couple of libraries for the modules so I thought of giving it a try. I spent hours trying to make them work, it took me hours to sent a simple integer from one Arduino to the other. Some time ago I have made my own remote control using a nRF24L01 module. I’ve written sketches for it so it can remote control my hexapod or my Rover 5. My Rover 5 has become my development platform. I’ve used it try out lots of different sensors. I’ve played with the encoders, tried out several libraries for the ultrasonic sensor.
When you have an Arduino on your desk you can use the serial monitor to see what is going on. But with a robot that is driving around that becomes a bit more difficult. My remote control has a 4×20 characters LCD, it is very handy to display the readings of the various sensors on the robot and display them on the LCD in my remote control.
In the beginning I just used an array of integers to sent over the wireless link. I recently wanted to sent an array of integers and an array of floats. Since you can not put different types in one array (?) I needed a different solution. I know very little about C++ so I started searching for a solution, the answer to my problem was a typedef struct. So I made the following sketches to try it out. I’ve also borrowed a couple of lines of code from the example sketches that come with the RF24 library. One Arduino has a bool “timout”, when it is true it will light a led. So you know when there is something wrong with the communication. It’s pretty handy with a robot, I shut down the motors on my robots if the link is lost.
Here are the sketches:
Arduino 1
// http://www.bajdi.com
// Sending a struct with the nRF24L01 module
// Data to be sent is the reading of 2 analog pins
// Data received is the analog reading of 2 pins on the other Arduino

#include <SPI.h>
#include "nRF24L01.h"
#include "RF24.h"

RF24 radio(1,2);  // make sure this corresponds to the pins you are using
const uint64_t pipes[2] = {
  0xF0F0F0F0E1LL, 0xF0F0F0F0D2LL };

const int led = 0;

typedef struct{
  int A;
  int B;
  float C;
  float D;
}
A_t;

typedef struct{
  int W;
  int X;
  float Y;
  float Z;
}
B_t;

A_t duino1;
B_t duino2;

void setup()
{
  Serial.begin(57600);
  pinMode(led, OUTPUT);
  radio.begin();
  radio.openWritingPipe(pipes[0]);
  radio.openReadingPipe(1,pipes[1]);
}

void loop(void)
{
  // we need data to sent...
  duino2.W = analogRead(A0);
  duino2.X = analogRead(A1);
  duino2.Y = analogRead(A0)/102.3;
  duino2.Z = analogRead(A1)/102.3;
  // end of analog reading

  // radio stuff
  radio.stopListening();
  bool ok = radio.write( &duino2, sizeof(duino2) );
  radio.startListening();

  unsigned long started_waiting_at = millis();
  bool timeout = false;
  while ( ! radio.available() && ! timeout )
    if (millis() - started_waiting_at > 250 )
      timeout = true;

  if ( timeout )
  {
    Serial.println("Failed, response timed out.");
    digitalWrite(led, HIGH);
  }
  else
  {
    radio.read( &duino1, sizeof(duino1) );
    digitalWrite(led, LOW);
  }
  // end of radio stuff

  // serial print received data
  Serial.print("duino1.A = ");
  Serial.println(duino1.A);
  Serial.print("duino1.B = ");
  Serial.println(duino1.B);
  Serial.print("duino1.C = ");
  Serial.println(duino1.C);
  Serial.print("duino1.D = ");
  Serial.println(duino1.D);
  // end of serial printing
}
Arduino 2
// http://www.bajdi.com
// Sending a struct with the nRF24L01 module
// Data to be sent is the reading of 2 analog pins
// Data received is the analog reading of 2 pins on the other Arduino

#include <SPI.h>
#include "nRF24L01.h"
#include "RF24.h"

typedef struct{
  int A;
  int B;
  float C;
  float D;
}
A_t;

typedef struct{
  int W;
  int X;
  float Y;
  float Z;
}
B_t;

A_t duino1;
B_t duino2;

RF24 radio(8,9);   // make sure this corresponds to the pins you are using
const uint64_t pipes[2] = {
  0xF0F0F0F0E1LL, 0xF0F0F0F0D2LL };

void setup()
{
  Serial.begin(57600);
  radio.begin();
  radio.openWritingPipe(pipes[1]);
  radio.openReadingPipe(1,pipes[0]);
  radio.startListening();
}

void loop(void)
{
  // we need data to sent...
  duino1.A = analogRead(A0);
  duino1.B = analogRead(A1);
  duino1.C = analogRead(A0)/102.3;
  duino1.D = analogRead(A1)/102.3;
  // end of analog reading

  // radio stuff
  if ( radio.available() )
  {
    bool done = false;
    while (!done)
    {
      done = radio.read( &duino2, sizeof(duino2) );
    }
    radio.stopListening();
    radio.write( &duino1, sizeof(duino1) );
    radio.startListening();
  }
  // end of radio stuff

  // serial print received data
  Serial.print("duino2.W = ");
  Serial.println(duino2.W);
  Serial.print("duino2.X = ");
  Serial.println(duino2.X);
  Serial.print("duino2.Y = ");
  Serial.println(duino2.Y);
  Serial.print("duino2.Z = ");
  Serial.println(duino2.Z);
  // end of serial printing
}
Posted in Arduino sketches | Tagged nRF24L01 |
By Bajdi on December 16, 2012
I’ve been playing with the WiiCamera the last days. After I had successfully written a sketch to track an IR light source I put the WiiCamera on my small Ebay-bot. The goal was that the robot would follow the IR light source. It was quite easy to program. I tried out my sketch by holding an IR led in front of the robot. It tracks the IR led pretty well. See the following video:
Then I decided to mount an IR led on my big Rover 5, I put it on the lower bracket of the gripper. Now the little robot could follow the Rover 5. The Rover 5 is remote controlled. I made a couple of changes to my previous sketch. When the WiiCamera loses track of the IR light source it starts sweeping the pan servo. That way it has a better chance to keep track of the IR light source. After some tuning I came up with this:
I had lots of fun with this, I’ve been driving around the house with my robots all day. I have another WiiCamera, maybe I should stick it on one of my other robots?
I really like the WiiCamera sensor, its very easy to work with. It doesn’t require difficult coding to do cool things with it. Here is the code I used to follow the Rover 5:
// http://wwww.bajdi.com
// Robot with 2 motors controlled by L293D, mcu = ATmega1284P-PU
// WiiCamera tracking IR light source (IR led, lighter, candle)
// WiiCamera mounted on pan/tilt kit, 2 SG90 servos
// Robot will try to follow the IR light source
// When it does not detect an IR led it will sweep the pan servo

// WiiCamera data:
// blob X = 0 IR source on the right
// blob X = 1024 IR source on the left
// blob Y = 0 IR source top
// blob Y = 1024 IR source bottom

#include <Servo.h>
#include <Wire.h>
#include <PVision.h>

Servo panServo;
Servo tiltServo;
PVision ircam;

int panServoLeft = 2250;
int panServoCenter = 1550;
int panServoRight = 850;
int panServoPos;
int tiltServoUp = 2200;
int tiltServoCenter = 1550;
int tiltServoDown = 1200;
int tiltServoPos;
int servoDirection;
bool IRdetected = false;

byte result;   // data from WiiCamera

#define runEvery(t) for (static typeof(t) _lasttime;(typeof(t))((typeof(t))millis() - _lasttime) > (t);_lasttime += (t))

const int EN1 = 3;        //pwm, enable motor 1 = pin 1 of L293D
const int direction1 = 2; //direcion motor 1 = pin 2 of L293D
const int EN2 = 4;        //pwm, enable motor 2 = pin 9 of L293D
const int direction2 = 5; //direction motor 2 = pin 15 of L293D

int speedLeft = 205; //there seems to be a bit of a difference between these cheap motors :(
int speedRight = 255; //this motor needs a bit more voltage to keep up with the other


void setup()
{
  Serial.begin(9600);
  pinMode(EN1, OUTPUT);
  pinMode(direction1, OUTPUT);
  pinMode(EN2, OUTPUT);
  pinMode(direction2, OUTPUT);
  analogWrite(EN1, 0);
  analogWrite(EN2, 0);
  ircam.init();
  delay(50);
  panServo.attach(22);
  panServoPos = panServoCenter;
  panServo.writeMicroseconds(panServoPos);
  tiltServo.attach(23);
  tiltServoPos = tiltServoCenter;
  tiltServo.writeMicroseconds(tiltServoPos);
  delay(500);
}

void loop()
{
  runEvery(15)
  {
    result = ircam.read();      // get the results from the WiiCamera
    if (result & BLOB1)        // IR detected
    {
      IRdetected = true;

      if (ircam.Blob1.X < 450 && panServoPos > panServoRight)
      {
        panServoPos -= 10;
      }
      if (ircam.Blob1.X > 550 && panServoPos < panServoLeft)
      {
        panServoPos += 10;
      }
      if (ircam.Blob1.X <= 550 && ircam.Blob1.X >= 500) // IR light close to center
      {
        panServoPos += 1;
      }
      if (ircam.Blob1.X < 500 && ircam.Blob1.X >= 450) // IR light close to center
      {
        panServoPos -= 1;
      }

      if (ircam.Blob1.Y < 450 && tiltServoPos < tiltServoUp)
      {
        tiltServoPos += 10;
      }
      if (ircam.Blob1.Y > 550 && tiltServoPos > tiltServoDown)
      {
        tiltServoPos -= 10;
      }
      if (ircam.Blob1.Y <= 550 && ircam.Blob1.Y >= 500) // IR light close to center
      {
        tiltServoPos -= 1;
      }
      if (ircam.Blob1.Y < 500 && ircam.Blob1.Y >= 450) // IR light close to center
      {
        tiltServoPos += 1;
      }
    }

    else {      // no IR detected = center the tilt servo, sweep the pan servo
      IRdetected = false;

      if(panServoPos < panServoLeft && servoDirection == 0)
      {
        panServoPos += 10;
      }
      if(panServoPos > panServoRight && servoDirection == 1)
      {
        panServoPos -= 10;
      }

      if (panServoPos >= panServoLeft )
      {
        servoDirection = 1;  //changes the direction
      }
      if (panServoPos <= panServoRight )
      {
        servoDirection = 0;  //changes the direction
      }


      if (tiltServoPos > tiltServoCenter) // center tilt servo
      {
        tiltServoPos -= 10;
      }
      if (tiltServoPos < tiltServoCenter) // center tilt servo
      {
        tiltServoPos += 10;
      }
    }
    panServo.writeMicroseconds(panServoPos);
    tiltServo.writeMicroseconds(tiltServoPos);
  }

  if(IRdetected == true)    // try to follow the IR source by moving the robot
  {
    if (ircam.Blob1.Size < 3)  // IR source far from robot
    {
      if(panServoPos < panServoCenter+200 && panServoPos > panServoCenter-200)
      {
        forward();
      }
      if (panServoPos >= panServoCenter+200)
      {
        left();
      }
      if (panServoPos <= panServoCenter-200)
      {
        right();
      }
    }

    if (ircam.Blob1.Size >= 3)    // IR source close to robot
    {
      if(panServoPos < panServoCenter+200 && panServoPos > panServoCenter-200)
      {
        backward();
      }
      if (panServoPos >= panServoCenter+200)
      {
        left();
      }
      if (panServoPos <= panServoCenter-200)
      {
        right();
      }
    }
  }
  else
  {
    stop();
  }

  runEvery(300)   // checking reading of WiiCamera sensor on serial monitor
  {
    Serial.print("BLOB1 detected. X:");
    Serial.print(ircam.Blob1.X);
    Serial.print(" Y:");
    Serial.print(ircam.Blob1.Y);
    Serial.print(" Size:");
    Serial.println(ircam.Blob1.Size);
  }
}

void forward()
{
  digitalWrite(direction1, HIGH);
  digitalWrite(direction2, HIGH);
  analogWrite(EN1, speedLeft);
  analogWrite(EN2, speedRight);
}

void stop()
{
  digitalWrite(direction1, LOW);
  digitalWrite(direction2, LOW);
  analogWrite(EN1, 0);
  analogWrite(EN2, 0);
}

void backward()
{
  digitalWrite(direction1, LOW);
  digitalWrite(direction2, LOW);
  analogWrite(EN1, speedLeft+35);
  analogWrite(EN2, speedRight-15);
}

void left()
{
  digitalWrite(direction1, LOW);
  digitalWrite(direction2, HIGH);
  analogWrite(EN1, speedLeft);
  analogWrite(EN2, speedRight);
}

void right()
{
  digitalWrite(direction1, HIGH);
  digitalWrite(direction2, LOW);
  analogWrite(EN1, speedLeft);
  analogWrite(EN2, speedRight-30);
}
Some photos of the little robot:
Posted in Arduino sketches, Dagu Rover 5 | Tagged robot, WiiCamera |