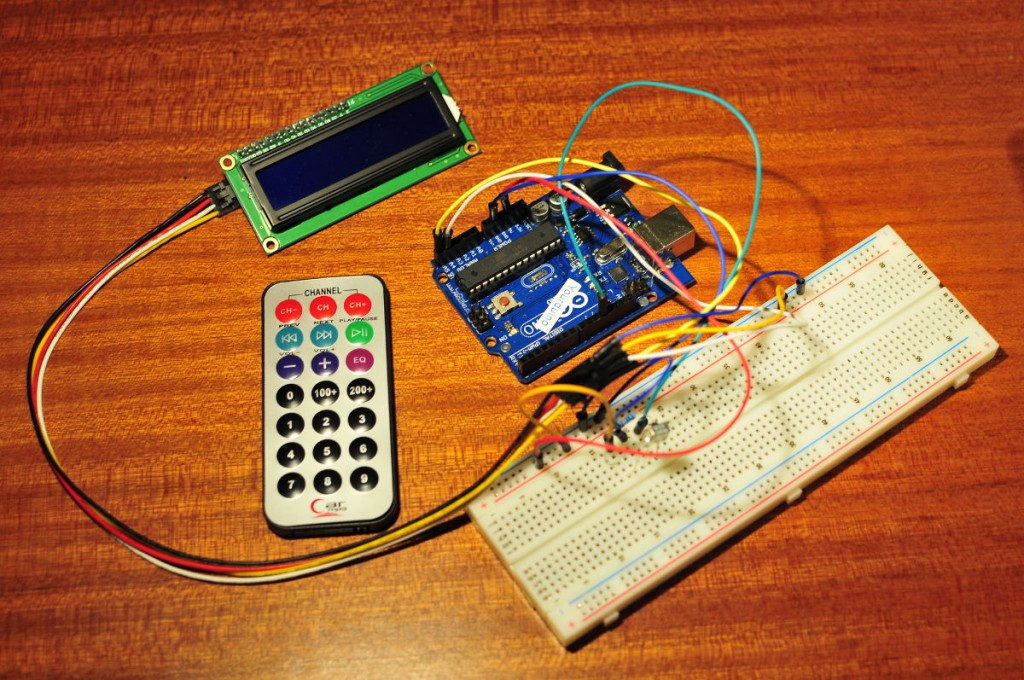
I have been playing with the infrared remote control that you can get here . This little remote control comes with an IR receiver and resistors, so you have everything you need to use it. How to connect the IR receiver you can see here. The beauty of Arduino is that there are hundreds of libraries that we can use to make our programs a lot easier. For IR receivers and transmitters we can use the IRremote library.
After installing the library and connecting the IR receiver we need to know which values are sent to the receiver when we press a button on the remote control. For this we can use the following code:
// http://www.bajdi.com
// based on code by Ken Shirriff - http://arcfn.com

#include <IRremote.h>  // use the library

int receiver = 11; // pin 1 of IR receiver to Arduino digital pin 11

IRrecv irrecv(receiver); // create instance of 'irrecv'

decode_results results;

void setup()

{
  Serial.begin(9600); // for serial monitor output

  irrecv.enableIRIn(); // Start the receiver
}

void loop()

{
  if (irrecv.decode(&results)) // have we received an IR signal?
  {

    Serial.println(results.value, HEX); // display it on serial monitor in hexadecimal

    irrecv.resume(); // receive the next value

  }  // Your loop can do other things while waiting for an IR command
}
After uploading this sketch to the Arduino we can open the serial monitor and see which values are sent to the receiver in HEX code. I typed the HEX values of all the buttons into a spreadsheet so i can easily access them for later use.
To check if I hadn’t made any mistakes I made the following sketch.
This sketch will show the number or name of the buttons from the remote control on an LCD display:
// Car MP3 IR receiver code translator
// http://www.bajdi.com
// Bought the Car MP3 IR receiver here: http://arduino-direct.com/sunshop/index.php?l=product_detail&p=153
// Found info and code here: http://www.arcfn.com/2009/08/multi-protocol-infrared-remote-library.html
// Copied most of the code from here: http://tronixstuff.wordpress.com/2011/03/30/tutorial-arduino-and-infra-red-control/

#include "Wire.h" // for I2C bus

#include "LiquidCrystal_I2C.h" // for I2C bus LCD module http://bit.ly/eNf7jM

LiquidCrystal_I2C lcd(0x27,16,2);  // set the LCD address to 0x27 for a 16 chars and 2 line display

#include <IRremote.h> // use the library for IR

int receiver = 11; // pin 1 of IR receiver to Arduino digital pin 11

IRrecv irrecv(receiver); // create instance of 'irrecv'

decode_results results;

void setup()

{

  lcd.init();          // initialize the lcd

  lcd.backlight(); // turn on LCD backlight

  irrecv.enableIRIn(); // Start the receiver

}

void translateIR() // takes action based on IR code received

// describing Car MP3 IR codes on LCD module

{

  switch(results.value)

  {

    case 0xFFA25D:  lcd.println(" CH-            "); break;

    case 0xFF629D:  lcd.println(" CH             "); break;

    case 0xFFE21D:  lcd.println(" CH+            "); break;

    case 0xFF22DD:  lcd.println(" PREV           "); break;

    case 0xFF02FD:  lcd.println(" NEXT           "); break;

    case 0xFFC23D:  lcd.println(" PLAY/PAUSE     "); break;

    case 0xFFE01F:  lcd.println(" VOL-           "); break;

    case 0xFFA857:  lcd.println(" VOL+           "); break;

    case 0xFF906F:  lcd.println(" EQ             "); break;

    case 0xFF6897:  lcd.println(" 0              "); break;

    case 0xFF9867:  lcd.println(" 100+           "); break;

    case 0xFFB04F:  lcd.println(" 200+           "); break;

    case 0xFF30CF:  lcd.println(" 1              "); break;

    case 0xFF18E7:  lcd.println(" 2              "); break;

    case 0xFF7A85:  lcd.println(" 3              "); break;

    case 0xFF10EF:  lcd.println(" 4              "); break;

    case 0xFF38C7:  lcd.println(" 5              "); break;

    case 0xFF5AA5:  lcd.println(" 6              "); break;

    case 0xFF42BD:  lcd.println(" 7              "); break;

    case 0xFF4AB5:  lcd.println(" 8              "); break;

    case 0xFF52AD:  lcd.println(" 9              "); break;

    default: lcd.println(" other button   ");

  }

  delay(500);

  lcd.clear();

}

void loop()

{

  if (irrecv.decode(&results)) // have we received an IR signal?

  {

    translateIR();

       irrecv.resume(); // receive the next value

  }

}
The LCD display used in this sketch is an I2C LCD display, very simple to connect to the Arduino, only needs 5V, GND and 2 wires (SDA and SCL) for the I2C bus. To talk to the LCD we need another library, the LiquidCrystal_I2C Library. I had a bit of trouble with this library. I first tried it in Arduino 1.0 and although my code compiled the LCD didn’t display anything. I then tried it in Arduino 0023 and it worked. I will need to look into to that later.
I wanted to use the remote control to control a couple of leds. I thought this was going to be easy but after hours struggling with the sketch I got nowhere. I ended up posting on the Arduino forum where I got some help and finally I was able to turn on and off 3 leds with my remote control.
This is the working sketch:
// http://www.bajdi.com
// Bought the Car MP3 IR receiver here: http://arduino-direct.com/sunshop/index.php?l=product_detail&p=153
// Found info and some code here: http://www.arcfn.com/2009/08/multi-protocol-infrared-remote-library.html
// Copied most of the code from here: http://tronixstuff.wordpress.com/2011/03/30/tutorial-arduino-and-infra-red-control/

#include  // use the library for IR

const int receiver = 11; // pin 1 of IR receiver to Arduino digital pin 11
const int led1 =  3;
const int led2 =  4;
const int led3 =  5;

IRrecv irrecv(receiver); // create instance of 'irrecv'

decode_results results;

boolean lightState1 = false;
boolean lightState2 = false;
boolean lightState3 = false;
unsigned long last1 = millis();
unsigned long last2 = millis();
unsigned long last3 = millis();

void setup()

{
  pinMode(led1, OUTPUT);
  pinMode(led2, OUTPUT);
  pinMode(led3, OUTPUT);
  irrecv.enableIRIn();
}

void loop()
{
  if (irrecv.decode(&results))
  {
    if (results.value == 0xFF30CF)
    {
      if (millis() - last1 > 300)
      {
      lightState1 =!lightState1;
      digitalWrite(led1,lightState1);
      last1 = millis();
      }
    }

    if (results.value == 0xFF18E7)
    {
      if (millis() - last2 > 300)
      {
      lightState2 =!lightState2;
      digitalWrite(led2,lightState2);
      last2 = millis();
      }
    }
    if (results.value == 0xFF7A85)
      {
       if (millis() - last3 > 300)
       {
       lightState3 =!lightState3;
       digitalWrite(led3,lightState3);
       last3 = millis();
       }
      }
irrecv.resume();
  }
}
